How to Set Up a Trail Camera
A cheap camera set up well beats an expensive one pointed at the wrong thing. Height, angle, direction, settings, and the public-land rules to check before you hang it.
How this is funded: we earn a commission if you buy through our links, at no extra cost to you. It never changes which product we recommend, and we’ll tell you plainly when we’d skip one. Full disclosure.
A trail camera is a scouting tool, and like every scouting tool it is only as good as the question you point it at. Most cameras that disappoint their owners are not bad cameras. They are good cameras hung at the wrong height, facing the wrong direction, aimed across a trail instead of down it, with the sensitivity set too high and a hundred feet of grass in the detection zone.
Everything below is free. It applies equally to a sub-$100 camera and a premium one, and it will do more for your results than upgrading would — which is also the argument for hanging three cheap cameras rather than one good one.
Before you buy: check whether you can use one
This is not a formality any more. Trail-camera rules on public land have changed rapidly and they vary considerably.
Delaware banned trail cameras for recreational use on state wildlife areas, state forests and state parks in 2023. The state’s stated reasons are worth reading because they explain the direction of travel: a proliferation of cameras on public land, complaints about hunters effectively claiming exclusive use of areas where their cameras sat, vegetation being cut and removed from state land to clear camera views, and privacy concerns from cameras documented monitoring parking areas and hiking trails.
Other states have introduced restrictions of their own, several aimed specifically at cellular cameras during big-game seasons, and more have been proposed. The rules differ by state, by managing agency, by camera type and sometimes by date. Check the current regulations for the specific ground you hunt, every season, before you hang anything — confiscation is a real outcome.
Height: waist to chest, and why
Three to four feet off the ground is the default for a standard trail set, and it is right for two reasons.
The passive infrared sensor detects moving heat, and at chest height it is looking directly at a deer’s body — the largest, warmest part of the animal. Mount it at eight feet and angle it down and the sensor is looking at a deer’s back at a shallow angle, which is a smaller thermal target presented worse.
The image is also better. A camera at deer height photographs a deer; a camera looking down photographs a back and a set of antler tips, which makes identifying individual animals considerably harder.
The exception is theft. On heavily-used public land, a camera at chest height on a trail is visible and stealable. Mounting at eight to ten feet on a python cable, angled down, costs you sensitivity and image quality and buys you a camera that is still there next month. That is a trade worth making where theft is a real problem and not otherwise. A no-glow camera, which shows no red emitter glow at night, is the better first line of defense.
Direction: face north
This is the setup rule that most improves image quality and almost nobody applies.
A camera facing east gets direct low sun at dawn. A camera facing west gets it at dusk. Those are the two hours deer move most, so you are guaranteeing washed-out, unusable images at exactly the times you cared about. Worse, direct sun on the lens and the sensor causes false triggers as sunlit vegetation heats and moves.
North-facing avoids both. If the trail geometry forces east or west, angle the camera slightly downward so the sun is above the frame, use a branch or the tree to shade the housing, and accept a run of blown-out sunrise photos.
Angle: 45 degrees down the trail, never across it
This single adjustment doubles or triples the number of usable photos most cameras produce.
Aimed perpendicular to a trail, the camera’s detection zone intersects the trail across a width of maybe eight or ten feet. A deer walking at four to six feet per second is inside that zone for under two seconds. Even a 0.1-second trigger gets one photo, and any lag at all gets you a tail.
Angled about 45 degrees so the trail runs toward the camera, the deer enters the detection zone twenty or thirty feet out and walks along it. It is in frame for several seconds. You get multiple photos, from multiple angles, of an animal getting steadily larger — which is what you need to identify a specific buck rather than record that a deer passed.
Distance: closer than the spec sheet suggests
Cameras publish a detection range and a night-illumination range, and they are not the same number. The sensor will trigger on a deer further out than the infrared emitters can usefully light, which is how you end up with a triggered night photo of a dark shape.
Twenty-five to forty feet is the working range for most cameras regardless of what the box claims. At that distance the illumination is strong, the deer fills a useful share of the frame, and the detection zone lines up with the trail rather than half a field.
Clear the detection zone, then clear it again
The number one cause of a card full of nothing is vegetation. Passive infrared triggers on moving heat, and a sunlit grass stem swaying in the breeze is moving heat.
Clear everything within about fifteen feet of the camera’s view. Then come back in a few weeks, because things grow. If you are on public land, keep the clearing to the minimum — cutting vegetation to clear camera views is one of the specific behaviors cited when agencies restrict cameras, and it is a good way to lose the privilege for everybody.
If false triggers persist after clearing, drop the sensor sensitivity one step. Losing a few marginal detections beats a card with two thousand photographs of grass on it.
Settings that actually matter
Photo burst over video, by default
A three-shot burst tells you nearly everything a video would about a deer passing a camera, and it uses a fraction of the battery and card space. Reserve video for a specific question — which direction do deer enter this field, is this the same buck — rather than leaving it on.
Delay: short on a trail, long on a feeder or scrape
The delay setting is how long the camera waits after a trigger before it will trigger again. On a trail, keep it short — five to ten seconds — because animals pass and you want each one. On a scrape or a food source where a deer might stand for twenty minutes, a longer delay of a minute or more stops one deer filling the card.
Lithium batteries in cold weather
Alkaline cells lose voltage sharply as temperature drops, and a camera reports a dead battery and stops recording while the cells still have capacity at room temperature. Lithium holds voltage far better in cold. The extra cost over a season is less than one wasted trip in.
Set the date and time before you hang it
Obvious, and skipped constantly. The timestamp is the entire value of the data — a photo of a buck without a reliable time on it tells you a buck exists, not when to hunt him.
Format the card in the camera
Not on a computer. Formatting in the camera writes the file structure the camera expects and prevents a class of corruption failures that people mistake for a broken camera.
Where to hang it: what you are actually asking
A camera answers a question. Decide the question before you pick the tree.
- “What lives here?”— A trail junction, a pinch point between two blocks of cover, or a creek crossing. High traffic, broad inventory.
- “Is this buck still here, and when?”— A specific scrape or rub line. Lower volume, higher specificity, longer delay setting.
- “When do deer enter this field?”— A field edge entry trail, angled down the trail rather than at the field.
- “How much pressure is this spot getting?” — Genuinely useful on public land, and the question fewest hunters ask. A camera on the access trail tells you how many other hunters walk past, which is often more actionable than deer photos.
The card-pull problem, and how to manage it
Every visit to a non-cellular camera costs you something. You leave scent, make noise, and pressure the spot you were trying to learn about. On public land, where the deer are already dealing with everybody else, that cost is real.
Manage it with discipline rather than gear:
- Pull cards on a schedule, not on curiosity. Two to three weeks, not every weekend.
- Go at midday, when deer are least likely to be moving.
- Go in with the wind wrong for the deerand right for your approach — a whitetail carries roughly 297 million olfactory receptors, and the scent you leave outlasts your visit by hours.
- Carry a spare card. Swap and leave, rather than standing at the tree reviewing photos.
If you genuinely cannot leave a spot alone, that is the argument for a cellular camera and it is a good one — the trade-off, including what a data plan costs over a season, is in cellular vs standard trail cameras.
The short version
Chest height, facing north, angled 45 degrees down the trail at twenty-five to forty feet, vegetation cleared, photo burst with a short delay, lithium batteries, correct date and time, card formatted in the camera. Then leave it alone for three weeks.
That setup on a cheap camera outperforms a careless setup on an expensive one, every season. The cameras we would put in that position are below, and the full field is in our cheap trail camera roundup.
The cameras worth setting up this way
Ranked on price-per-performance — the specs that matter divided by what it costs. Select a row to jump to the full write-up. We have not field-tested these — here is exactly what we do instead.
| # | Product | Trigger | Score | Price |
|---|---|---|---|---|
| 1 | 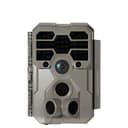 GardePro A60 Trail Camera Best all-around cheap camera The two numbers that decide whether a camera earns its spot on a trail — a stated 0.1-second trigger and 100 feet of 940 nm no-glow infrared — behind a Sony Starvis sensor. Trigger speed is the spec that decides whether you get a buck or a photo of an empty trail. | 0.1 s · 4K | 8.9/ 10 | |
| 2 | 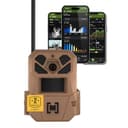 Moultrie Edge 3 Cellular Best if you cannot keep visiting A cellular camera for around $70 is genuinely new. Sending photos to your phone means you stop walking into your own hunting spot to check a card — which on pressured public ground is worth more than any camera spec. | 0.5 s · cell | 8.7/ 10 |
Check your state’s regulations. Hunting laws vary by state and change year to year — legal calibers, minimum bow draw weights, blaze-orange rules, seasons and treestand requirements included. Confirm the rules with your state wildlife agency before you hunt. Blaze & Budget is written by an enthusiast, not a game warden, and nothing here is legal advice.
Frequently asked questions
How high should you mount a trail camera?
Waist to chest height, roughly three to four feet, for a standard trail set. That puts the sensor level with a deer's body, which is where the passive infrared detector works best, and it gives you a photo that shows the whole animal rather than a back. Mounting higher and angling down is a theft-deterrent tactic on public land, but it costs you detection sensitivity and image quality, so only go high where theft is a genuine problem.
Which direction should a trail camera face?
North, or as close as the setup allows. A camera facing east or west takes direct sun at dawn and dusk, which are exactly the hours deer move — the sensor gets false triggers from sunlight and heat, and the images wash out completely. Facing north avoids both. If the trail forces you east or west, angle the camera slightly downward and shade it with a branch, and expect a run of blown-out sunrise photos regardless.
Should you point a trail camera straight at a trail?
No — angle it about 45 degrees down the trail rather than perpendicular to it. A camera aimed straight across gives the deer a detection zone only a few feet wide, so even a fast trigger can miss it. Angled down the trail, the deer walks toward the camera and stays inside the detection zone and the frame for several seconds, which gives you multiple usable images and a much better chance of identifying the animal.
Why is my trail camera taking pictures of nothing?
Almost always vegetation moving in the detection zone and heating in the sun. Passive infrared sensors trigger on moving heat, and a sunlit grass stem or branch swaying in front of the lens reads as exactly that. Clear everything within about fifteen feet of the camera's view, check it again after a few weeks of growth, and if the problem persists reduce the sensor sensitivity a step. Facing the camera north rather than east or west removes most of the remaining false triggers.
How often should you check a trail camera on public land?
Less often than you want to. Every visit leaves scent and pressures the exact spot you are trying to learn about, and on public ground the deer are already dealing with pressure from everyone else. Every two to three weeks is a reasonable rhythm, done in the middle of the day when deer are least likely to be moving, treated as a scouting trip rather than a card pull. If you genuinely cannot leave a spot alone, a cellular camera solves the problem for the price of a data plan.
Are trail cameras allowed on public land?
It varies by state, by land-management agency, by camera type and sometimes by time of year, and several states have changed their rules recently. Delaware banned trail cameras for recreational use on state wildlife areas, forests and parks in 2023, citing camera proliferation, hunters claiming exclusive use of areas, vegetation being cut for camera views, and privacy complaints. Others restrict cellular cameras during big-game seasons. Check with the managing agency each season before you hang anything.
Sources
- Delaware Bans Trail Cameras for Recreational Use on State Wildlife Areas, State Forests and State Parks — State of Delaware — A state-agency trail-camera ban on public land, citing camera proliferation, hunters claiming exclusive use of areas, vegetation cutting and privacy complaints (accessed August 19, 2026)
- To Kill Mature Bucks, Reveal the Wind — National Deer Association — A whitetail carries roughly 297 million olfactory receptors to a dog's 220 million; scent forms a consistent cone above 8-10 mph and eddies unpredictably below it (accessed August 12, 2026)
- Hunting — US Forest Service — USFS rules for hunting on National Forest System land — state-law compliance and area restrictions (accessed July 22, 2026)
- The Hunter's Guide to Deer Vision — National Deer Association — Deer have two cone photopigments rather than three and no red cone; they see blues and greens well, lack a UV filter, and cannot distinguish orange from red (accessed August 12, 2026)
Keep reading
Best Cheap Trail Camera
The cameras themselves, compared on trigger speed, flash type and live price.
See the picksGardePro A60 Review
Our top budget pick examined in detail, including what its numbers mean in the field.
Read the reviewCellular vs Standard Trail Cameras
The card-pull problem this guide works around, and what solving it costs.
Read the comparisonDeer Hunting on a Budget
Where scouting cameras sit against everything else competing for the same money.
Read the guide